-
Free Method to Make PowerPoint to Video Using Windows Live Movie Maker
Posted on May 24th, 2012 No commentsAlthough PowerPoint is widely used in our lives and generally regarded as the best program to make presentations, yet if you want to share your PowerPoint on YouTube, you will find that you can’t. Because YouTube accepts only video formats like MP4, FLV, AVI, WebM and so on. One of the solutions is to convert PowerPoint to video.
Leawo PowerPoint to Video converter helps you to save PowerPoint as video formats like MP4, FLV, AVI, WMV, MOV, MKV, etc. and preserve animation, transition, music and video clips in the PowerPoint files.

A time-effective method, but not free method. If you like, you can use the Windows Live Movie Maker to create a movie from your PowerPoint slideshow or photos. You can get the Windows Live Movie Maker here for free. Then follow the steps below to turn your PowerPoint to video using Windows Live Movie Maker.
Part 1: Save PowerPoint as pictures
PowerPoint formats are not supported by Windows Live Movie Maker, so you need to save PowerPoint slides as pictures first.
Step 1: Open your PowerPoint and click “Save As”, in the popup windows, choose an image format as “Save as Type”, like JPEG, GIF, PNG, TIFF.

Step 2: A prompt will show up, choose “Every Slide” to save all the PowerPoint slides as pictures.

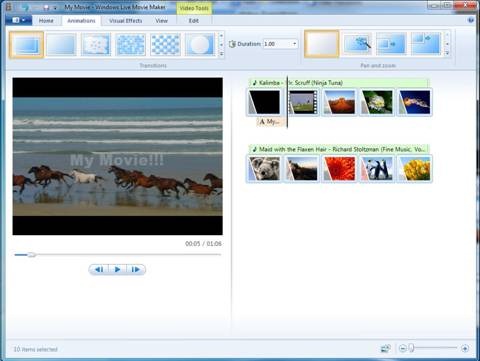
Part 2: Create video using Windows Live Movie Maker
After saving PowerPoint as pictures, all the features like animation, transition, music and video clips will be removed. But don’t worry, they can be added again in the Windows Live Movie Maker, although not exactly the same as the original.
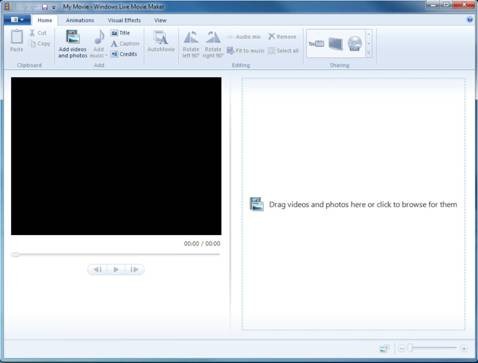
Step 1: Import the pictures into Windows Live Movie Maker. Click “Home” → “Add videos and photos” and import all the output PowerPoint pictures.

Step 2: Add background music. Click “Add music” to insert songs as background music. Because the timeline has been removed in Windows Live Movie Maker, you have to go to “Options” of “Music Tools” to set the timing of the songs.

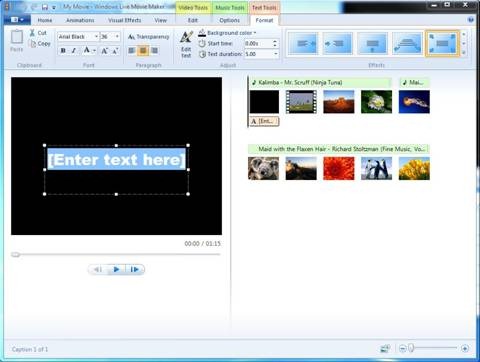
Step 3: Add animations to the pictures.

Step 4: Add visual effects. These visual effects can be found in the picture format of PowerPoint.

Step 5: Save the movie. The output video format is WMV.

The function of Windows Live Movie Maker is limited, but it does provide a free method to save your PowerPoint as video for publishing on YouTube.
займ на карту rusbankinfo.ru
-
Apple updates its professional video editing suits, including: Final Cut Pro X, Motion and Compressor
Posted on April 10th, 2012 No commentsAs a professional video editing tool, Final Cut Pro X has been as popular as other video editing programs, like Windows Live Movie Maker, iMovie, Video Editor, etc. People worldwide have been using this professional video editing tool to edit videos and images to better enjoy their digital life. On Tuesday, Apple officially updated its Final Cut Pro X to version 10.0.4, which brings a list of stability, compatibility and performance improvements. Meanwhile, Apple also added a Share option for 1080P video that works with compatible iOS devices. Besides these, Apple also included the support for multicam metadata in the XML profect exports for better user experience. This update includes three aspects of the professional video editing suits: Final Cut Pro X 10.0.4, Motion 5.0.3 and Compressor 4.0.3. Check the following details to know the specific update of Apple’s professional video editing suits.
 Final Cut Pro X version 10.0.4 improves overall stability, performance, and compatibility including:
1. Improves image quality and responsiveness of broadcast monitoring with compatible third-party PCIe and Thunderbolt I/O devices.
2. Improves performance of multicam syncing and editing.
3. Adds language support for Simplified Chinese.
4. Adds a Share option for 1080p video on compatible iOS devices.(the following issures are also addressed in the version 10.04)
5. Assigns default audio channel setting for new projects to stereo.
6. Includes multicam metadata in XML project export.
7. Fixes an issue in which video superimposed over a background with an alpha channel could appear differently in Viewer before and after render.
8. Fixes an issue that caused some titles to be rendered again after each application launch.
Available for download via Mac App Store.Motion 5.0.3 improves overall stability and performance including:
1. Improves loading time for projects.
2. Improves performance of text editing in the Canvas.
3. Fixes issues with Fill Opaque enabled in images converted to Drop Zones.
4. Resolves a stability issue that occurred when deleting all characters with the Transform Glyph tool.
5. Corrects the pixel aspect ratio display of Anamorphic clips.
6. Improves speed of Save Current Frame.
7. Resolves a stability issue when adjusting motion blur controls in the Project Properties Inspector.
8. Resolves a stability issue when modifying media files while Motion is running in the background.For more detailed information, visit http://www.apple.com/finalcutpro/motion.
Compressor 4.0.3: As Final Cut Pro’s export tool, Compressor gets a minor update with overall performance tweaks including running the program as an encoding node sans monitor.
1. Ability to run Compressor as an encoding node on a Mac without a monitor.
2. Fixes an issue with exporting when logged in as an Open Directory user.
3. Improves performance when encoding mp4 and AVI files.By the way, another news mentioned here: according to the latest news from 9to5 site, Apple is about to release the iTunes 11 Test version in the near future, which reportedly will consolidate iCloud and add network backup and iTunes Match functions. The newly added functions are compatible with iOS 6 and may realize in the 10.X version.
займ на карту rusbankinfo.ru
-
How to edit DVD movie with Windows Live Movie Maker
Posted on November 30th, 2009 No commentsWindows Live Movie Maker is a component of Windows Live Essential Package, which comes independently of Windows 7, the latest Windows operation system. Anyway, to access Windows Live Movie Maker, you just need a few minutes to download it from Microsoft official site and it is totally free. As was mentioned in an early post, Windows Live Movie Maker is a rebirth from the traditional Windows Movie Maker. One of the most impressive renovations is that additional video types are supported, e.g. MP4, MOV, 3GP, MTS. But one may be frustrated on how to edit DVD movie with Windows Live Movie Maker, because DVD movie is not a native support option of Windows Live Movie Maker. Fortunately, you have timely support from us. Among our long lineup of products, Leawo DVD to MP4 Converter is born to suit the job. It can easily and fast rip your DVD movie from the disc and convert it to high quality MP4 video that can be imported for edit in Windows Live Movie Maker. Now, let’s get your DVD movie into Windows Live Movie Maker.
Download Leawo DVD to MP4 Converter here for free. Install and run it. Then put you DVD movie disc into your DVD drive. Click "Load DVD" to automatically analyze and display information of the DVD movie.
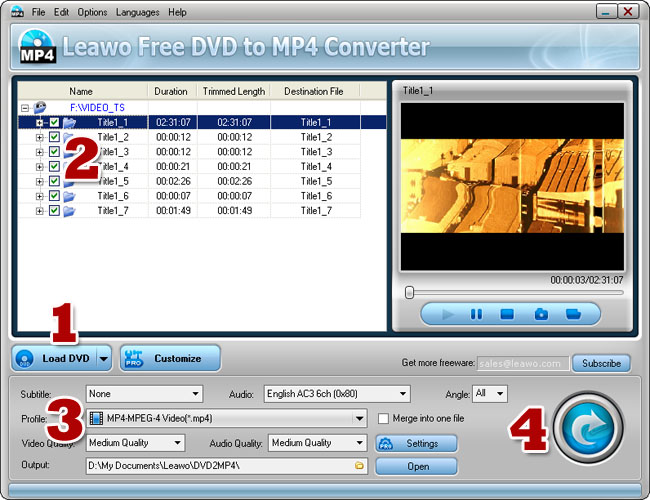
Tips: the program selects all titles by default. You can check and uncheck any titles and chapters you want to convert. If you want to get a specific playback preview, double click on the title or chapter you selected.
After you load the DVD movie and make selections, click on the rollout list of profiles and select "Common Video -> MP4 – MPEG-4 Video (*.mp4)". This will convert your DVD movie to regular MP4 videos. Then click "Convert" to start the DVD to MP4 conversion process.
Leawo Free DVD to MP4 Converter is a quick and handy tool for on-demand DVD to MP4 conversion. However, some features for advanced users are excluded in this free edition. If you would like to get excessively good output quality and do practical video customizations, just get Leawo DVD to MP4 Converter Pro here.
-
Can I use Windows Live Movie Maker in a more efficient way?
Posted on November 22nd, 2009 No commentsYes! Windows Live Movie Maker is a remake of the default Windows component based on much advanced and human technologies. Some new features are especially added in the perspective of a better operability and efficiency. Let’s take a look at how the efficient features can appeal to us.
Firstly, use keyboard shortcuts! Windows Live Movie Maker adopts the same Ribbon design introduced in Office 2007. This "scenic" and magical Ribbon erases the complexity of menus and reduces access time by always putting user’s favorite functions at the front. If you are a keyboard shortcut fanatic, you could find Windows Live Movie Maker embraces familiar keyboard shortcuts as are used in Office 2007. Apart from ordinary shortcuts, here is a table illustrating particular shortcuts in Windows Live Movie Maker.
General keyboard shortcuts
To
Press
Toggle ribbon keytips on and off
Alt
Stop the current task
Esc
View Help for Movie Maker
F1
Close Movie Maker
Alt+F4
Save a project with a new name
F12
Create a new project
Ctrl+N
Open an existing project
Ctrl+O
Save a project
Ctrl+S
Undo the last action
Ctrl+Z
Redo the last action
Ctrl+Y
Previewing and editing keyboard shortcuts
To Press
Play or pause
Space or K
Go to the previous frame
J
Go to the next frame
L
Trim the video so it starts at the current point in the video
I
Trim the video so it ends at the current point in the video
O
Split the video into two items at the current point in the video
M
Storyboard keyboard shortcuts
To Press
Cut the selected item
Ctrl+X
Copy the selected item
Ctrl+C
Paste
Ctrl+V
Delete selected items
Delete
Move the selection one item in the direction of the arrow
Left Arrow, Right Arrow, Up Arrow, Down Arrow
Move the focus one item in the direction of the arrow
Ctrl+Left Arrow, Ctrl+Right Arrow, Ctrl+Up Arrow, Ctrl+Down Arrow
Move the selection up one page
Page Up
Move the selection down one page
Page Down
Select the first item on the storyboard
Home
Select the last item on the storyboard
End
Select all items on the same track of the storyboard
Ctrl+A
Zoom in on the storyboard
Plus Sign (+)
Zoom out on the storyboard
Minus Sign (-)
To name a very special one of the shortcuts, there is a very intuitive way in edit videos on the Storyboard, i.e. use "Ctrl" key and key "A" combination to make a full selection of the videos to batch edit them through one shot. Similar to the scenery in the file browser, you can hold down Ctrl Key and select multiple videos to batch edit, which is very efficient when you want to apply many videos with the same setting.
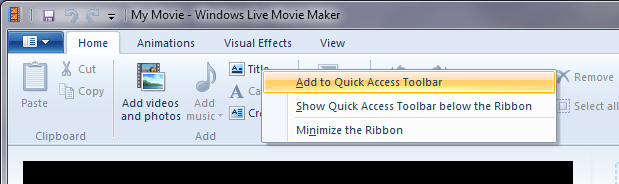
Secondly, use Quick Access Toolbar! You can self-customize a set of shortcut to your liking. Hover to the function icon and right click to expose a context menu as below. It will add the function to the Quick Access Toolbar and allow you to quick access it with key combinations of "Alt" key and numeral key "0"-"9".
Thirdly, use Multi-monitor span! If you are handling a huge batch of video clips, don’t sigh as your monitor screen is not big enough to give you a full view of them, because Windows Live Movie Maker seamlessly supports multiple monitor display! You can just span the interface to the second monitor to get the video preview and the Storyboard to display separately on the monitors. Would you not prefer a nice and clear view of the work you are doing?
I would like to conclude by saying Windows Live Movie Maker is really a wow to us home video makers. User experience is greatly improved. Novice users will be happy to see not only the bar is lower but they are given more flexibility to use the program in their favorite way. Whether or not you are big on efficiency, you would unlikely resist such appeal.
займ на карту rusbankinfo.ru
-
On the journey to Windows Live Movie Maker, a magical rebirth
Posted on November 20th, 2009 No commentsEven since its introduction in Windows Me, Windows Movie Maker has been a default component of the following Windows versions until the latest Windows 7. Rather than detached from the system, it is completely rebuilt from the core. With an orderly name, Windows Live Movie Maker is now available in Windows Live package along with Windows Live Photo Gallery and Windows Live Mail. Note that the program is no longer expected to run on Windows XP, because it is based on advanced technology brought in by Vista. For better or worse, it is good to see the Phoenix gain a new life after death.
Here we are going to look into how Windows Live Movie Maker is different from the old Movie Maker.
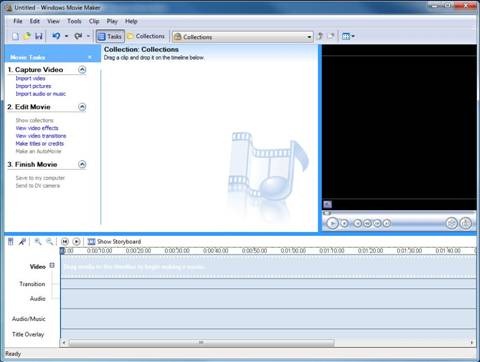
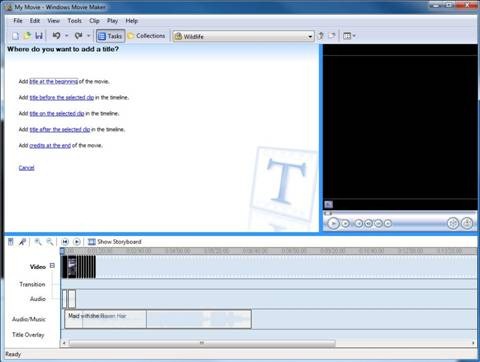
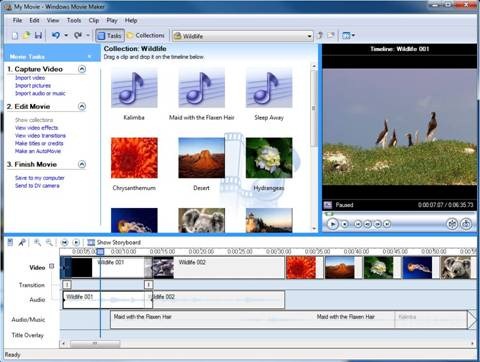
Firstly, the program’s UI is reorganized and polished. If we put them side by side, the harsh and intimidating look of the old Movie Maker is absolutely not an eye candy, just for the first glimpse. Most users including me who are new to the movie maker will undoubtedly fancy a steep learning course of making a movie. The timeline view is the biggest contributing factor. It is bad to greet home users, the main user group of the program, with too much professionalism at the startup. So inside Windows Live Movie Maker, the timeline is totally "gone".
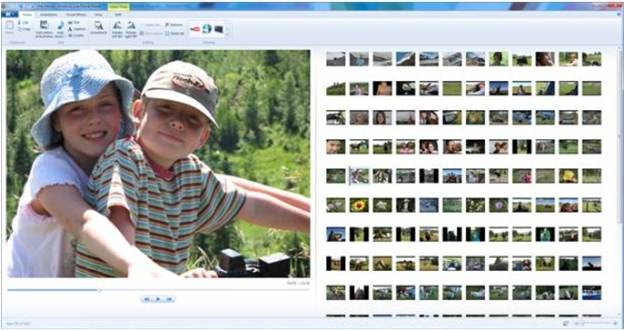
In fact, the new movie maker has introduced an innovatively friendly style in place of timeline, which I am going to review later. The preview window is logically resized compared to the one in the old version stuffing in the place as if it shouldn’t be there. And if you are familiar with Office 2007, you must be amazed at the elegant Ribbon menu, which has now been implemented in Windows Live Movie Maker as well. The overall impression is intuitive, reasonable and comfortable, not to mention the visual stun brought by the system’s Aero effect.
comparison between home layouts
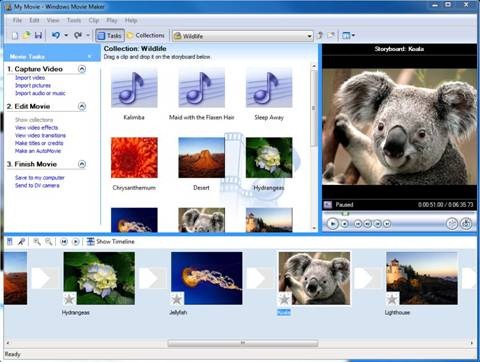
Secondly, we often care much about how to begin using the program and how we may expect from the program. And Windows Live Movie Maker does seem nothing like the old maker. In the old maker, the first thing we do is create a new project and then import videos. To edit the video, we have to drag them onto the timeline. The thumbnail of the video will immediately resize to the scale of its time length, which is fine for people who want to align the videos and audios as they would like it to work as it looks. What about Windows Live Movie Maker on the right hand side?
comparison between video imports
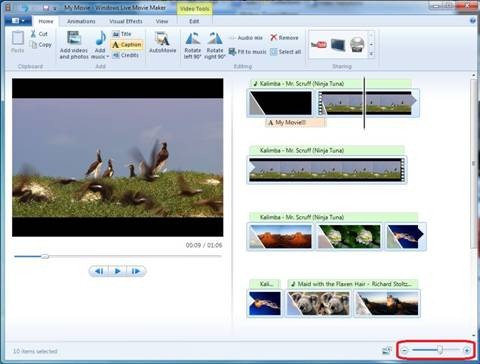
If you are puzzled at how the videos can be edit without a timeline, you should be pleased you are no longer going to deal with one too long to go without a scroll bar in company. Instead of arranging the videos on linear timeline, Windows Live Movie Maker gives a smooth and distinct look of the videos on the storyboard with regular size thumbnails. As you can see, this arranging style goes way more complete and natural than the scrollable timeline, and it spares quite a large space to add in more sources. With the same amount of video clips, the old movie make can’t cater to more without scroll bars, and that inevitably creates a stifling view. In contrary, Windows Live Movie Maker stays fine with its space saving style.

comparison between Storyboards
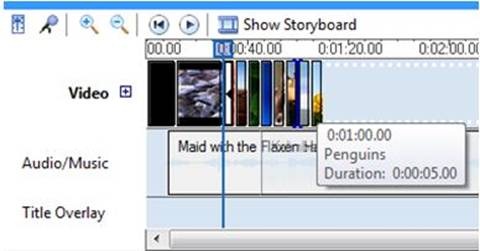
Thirdly, this is where I am going to review how the concept of timeline is reflected in Windows Live Movie Maker. In the old version, if we want to stretch the thumbnail on the timeline, we use the magnifier. The same in the new maker is an intuitive zooming slide bar as is marked at the bottom right. As you move the slider, you can zoom in or out on the thumbnail smoothly. The width of the thumbnail will change according to its time length. So you can easily judge the clips based on its relative length.
comparison between zoom features
Note than you can benefit from the new layout. It is usually troublesome to shuffle a clip to a new place in the old maker, because the clips are so compacted together and you may lose the idea of which video you are actually picking at. As is shown in the comparison below, I think you may prefer the more distinct and accurate way featured in Windows Live Movie Maker. This is the reason and result for the remake of the program, to become friendlier in user experience.
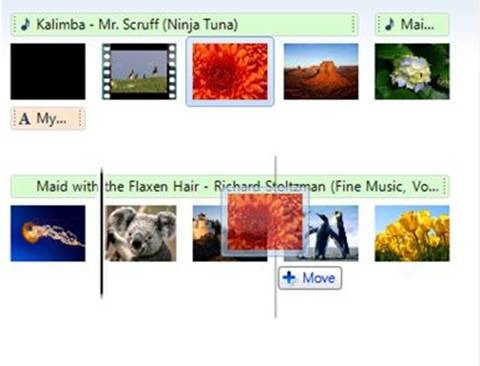
comparison between video reorderings
Fourthly, in terms of transition effect, instead of all or nothing approach, the new maker only display the most commonly used ones on the Ribbon. It means the program could smartly understand the user’s habit and automatically alter itself to go with it. Just one of the merits the Ribbon possesses.

comparison between transition effects
It could hardly deny the significant renovation does bestow a new life on this popular household movie maker. I am not saying bad words against the old maker. It remains the best choice for simple movie making at home on Windows XP and previous systems. Windows Live Movie Maker is a tribute only to Windows 7 and Vista, so you have to upgrade your system before taste the magical rebirth of the beloved movie maker.
займ на карту rusbankinfo.ru


Recent Comments