Last updated on 2013-07-23, by
How Do I Backup My iPad
My iPad backup job has become difficult ever since I updated my iTunes a month ago, the Apple official backup service just blocks my iPad from time to time. It’s kind of ridiculous, right? But if I can’t backup my iPad, that will be annoying, because I use it both at work and at home, so if the data get lost, it will be really bad.
I have been searching on the Internet for methods to backup iPad for days, yet, haven’t found perfect solutions. Neither the iCloud backup nor the Dropbox back are out of my consideration. Even Apple developers’ site could be hacked, why not others? So I prefer to put my private files on my computer other than put them in the cloud. So what I need may be an iTunes alternative to help me with the backup work.
Fortunately, I found one easy-to-use backup tool. It is called Leawo iTransfer, and the functions it has may surprise you. Any media files transfer can be easily done among iOS devices, iTunes and PCs. Backing up iPad is just a piece of cake. It will also make your iOS device as a flash drive so that you can put in any files you want. So how do I backup my iPad with Leawo iTransfer? Check the following guidance out.
Download Leawo iTransfer and try it for free:
1. The iTunes should be installed on the computer to guarantee Leawo iTransfer work; 2. Leawo iTransfer is shareware, and you can try the free version first and check out whether it meets your needs.
Full Guide

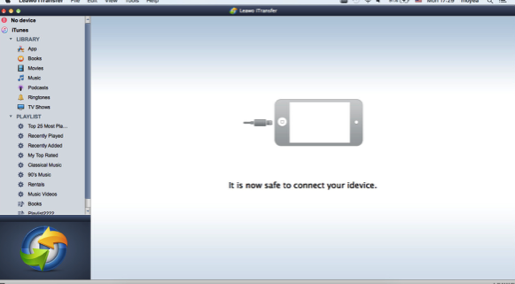
Run iTransfer and Connect iPad
Run the software after installing. The iTransfer will automatically detect your iPad and show your iPad information in the software window. You are able to have a general browse of the files in your iPad Library.

Select Files
Choose the media files you want to backup. Set photos as an example. Choose Photo Library and click the transfer button![]() to get to the transfer settings. Or select the certain photos you want to backup and right click the chosen photos to “Transfer” to “My Computer”.
to get to the transfer settings. Or select the certain photos you want to backup and right click the chosen photos to “Transfer” to “My Computer”.

Backup Settings
In the backup settings, you are able to choose a folder for your backups. My suggestion is to choose a solid folder which you rarely move as the backup folder for all your iPad files. When you have chosen the folder, click “Transfer Now” to start transfer.

Finish Backing Up
The backup process starts as soon as you click the button. A transfer dialog shows up and notices you the percentage of iPad backup. When the backup process is finished, the photos will be duplicated to the target folder.
I finished backing up my iPad in minutes because I don’t have that many files in my iPad. If you have thousands of pictures and hundreds of movies, or piles of ebooks in your iPad, you can also feel free to backup them to your iPad. The large files’ backup process will take a while but the process is absolutely stable. If you have voice memos, notes and bookmarks in your iPad, you can try Leawo iOS Data Recovery, although it is called “Data Recovery”, it can also be used for backing up files which Leawo iTransfer hasn’t supported yet.
If you search for the transfer or backup software on the Internet, you may find various kinds of freeware, I don’t recommend any piece to you. I have tried some pieces of the freeware, none of these pieces of freeware are fast in speed or powerful in functions, and virus may also be hidden within them.
Video Guide Software
iTransfer 
An iTunes assistant to transfer data among iDevices, iTunes and PC.
$19.95
Platfrom: Windows 7/Vista/XP


-

[Review] Best Disney Plus Downloader to Use for 2024Vinho/2024-03-11
-

[2024 Guide] Best Methods to Download Hulu Episodes OnlineCassie/2024-03-24
-
Netflix Download Limit: What it is & How to AvoidAugust/2024-02-18
-

5 Best Netflix Video Downloaders in 2024August/2024-02-18
-

Detailed Guide on How to Download Movies on Disney PlusVinho/2024-01-30
-

How to Import Bookmarks from Safari to ChromeCynthia/2018-01-04
-
3 Ways to Transfer Files from PC to iPhoneCynthia/2017-12-18
-
How to Get Photos from iPhone to MacCynthia/2017-12-18
-
3 Ways to Transfer Photos from iPhoto to iPhoneCynthia/2017-12-18
-

How to Airdrop from iPhone to MacCynthia/2017-12-07
-
How to Play MKV Files on PCDavid Brooks/2016-11-03
-

Best DVD player software – How to play DVD movies in WindowsDavid Brooks/2014-03-16
-

How to change region code of Blu-ray player software while playing back Blu-ray discsDavid Brooks/2013-08-20
-
How to Recover Photos from Samsung Galaxy S3?Dupont/2013-08-01
-
5 Free Methods to Import CSV/VCF Contacts to iPhone 5/4S/4/3GSAmanda/2013-07-14
-

How to Transfer Movies from Computer to iPad retinaWebber/2013-05-29
-

How to download PSY – GANGNAM STYLE video to computer, iPhone 5, Galaxy S IV, Lumia 920, Xperia Z, and other devices for totally freeDavid Brooks/2014-01-26
-
3 Methods to Transfer Photos from iPhone 5 to ComputerTony/2013-05-15
-
KMplayer vs. GOM Player – Find the better Windows media player software for youDavid Brooks/2014-03-16
-
How to Import Bookmarks from Safari to ChromeCynthia/2018-01-04
